Recent Updates Toggle Comment Threads | Keyboard Shortcuts

  • Jimbo Alba 5:31 am on August 20, 2014 Permalink | Reply
    Tags: nintex, workflow   

    Nintex Workflow 2010 (Standard Edition) Installation 

    Following the Nintex Workflow 2010 Installation Guide here’s my installation notes:

    • Install Nintex on the server where the SharePoint Central Administration (SPCA) is hosted
    • Use the SharePoint Farm Installation account
    • The following SharePoint Services should be running:
      • Microsoft SharePoint Foundation Web Application (WFE and Application Server)
      • Microsoft SharePoint Foundation Workflow Timer Service (Application Server only)
    • Set the User Account Control to Never Notify
    • On Windows Services (Start ->Run services.msc) make sure SharePoint 2010 Administration service is running.

    Installing Nintex Workflow 2010

    • On Section 1.1 Run installer
      • Add the solution to SharePoint
      • Select ‘Install Nintex Live’ when prompted.
    • On Section 1.2 Deploy the Solution Package
      • On SPCA->Manage farm solutions deploy ‘nintexworkflow2010.wsp’ to ‘All content Web applications’
      • On SPCA->Manage farm solutions deploy ‘nintexworkflow2010.wsp’ to the Central Administration web application
      • Do not deploy nintexworkflow2010enterprisefeatures.wsp
    • On Section 1.3 IntallingNintex Workflow 2010 Enterprise
      • Not Applicable
    • On Section 1.4 Importing the License
      • The license is sent via email when you request for a trial from their site

    Database Configuration

    • On Section 2.1 Database configuration
      • Name the configuration database as ‘NintexWorkflow2010DB’.
    • On Section 2.2 Adding a Content Database (optional)

    Configure Nintex Workflow 2010

    • On Section 3.1 Web Application Activation
      • activate on web application
    • On Section 3.2 EnableNintex Workflow 2010 Workflow Actions
      • Select/Enable all actions
    • On Section 3.3 Configuring Email Settings
      • Set Email settings as appropriate
        • Set From and Reply To address to ‘nintex-noreply@yourdomain.com’
      • Set Allow verbose workflow logging to Yes
      • Set the rest of the settings on default setting
    • On Section 3.4 Enabling and ConfiguringLazyApproval
      • Enable Lazy Approval

    Nintex Live

    • On Section 4.1 Establishing a Connection toNintex Live
      • Verify a successful connection to ‘Nintex Live connection test’
    • On Section 4.2 EnablingNintex Live forNintex Workflow
      • SPCA->Nintex Workflow Management->Live Settings->Enable Nintex Live for Workflow

    Activate Features

    • On Section 5.1 Site Collection Activation
    • Enable the following features on the site collection level
      • Nintex Workflow 2010
      • Nintex Workflow 2010 InfoPath Forms
      • Nintex Workflow 2010 Web Parts
      • Nintex Workflow – Nintex Live Catalog
    • On Section 5.2 Site Activation
      • Enable feature on the site level
        • Nintex Workflow 2010

    Installation done.

     
  • Jimbo Alba 4:40 am on July 9, 2014 Permalink | Reply
    Tags: HTML Emails   

    Sending Email Friendly SharePoint Designer HTML Emails 

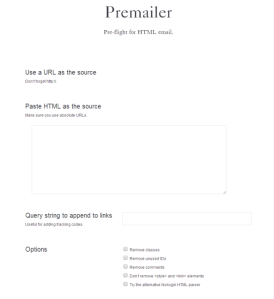
    Sending HTML Emails can be frustrating when not done correctly. CSS formatting is lost when you view it inside your favorite email client. The level of support varies between email client but most of them works well with inline CSS. Now if you have finished creating you HTML Email you need to inline all your CSS. You can use Premailer for that. Premailer

    1. Go to Premailer
    2. Paste the HTML as the source. Make sure you use absolute URLs
    3. Copy the HTML result
    4. Use any text editor to replace all double quotes (“) into single quotes (‘)
    5. Minify your code. Minifying just means removing all line breaks and spaces. Minifying code is a must with SPD HTML Emails. There’s a lot of online tools, and prettydiff is one, that can you help you do this. NotePad++ has this too by Menu->Edit->Blank Operations-> Remove Unnecessary Blanks and EOL.

    Minifying code is a must with SPD HTML Emails. There’s a lot of online tools, and prettydiff is one, that can you help you do this. NotePad++ has this too by Menu->Edit->Blank Operations-> Remove Unnecessary Blanks and EOL.

    That’s it! Follow my blog article SharePoint 2010 Designer HTML Emails.

     
  • Jimbo Alba 4:29 am on July 9, 2014 Permalink | Reply  

    SharePoint 2010 Designer HTML Emails 

    There are many reasons why you’ll want to send emails in html. With html email you can have better looking emails with better formatting and pictures. In my case, I need to add the version number on the SharePoint Alert email. I can add the version number to the email so I figured I can just make it look like the SP Alert email instead.

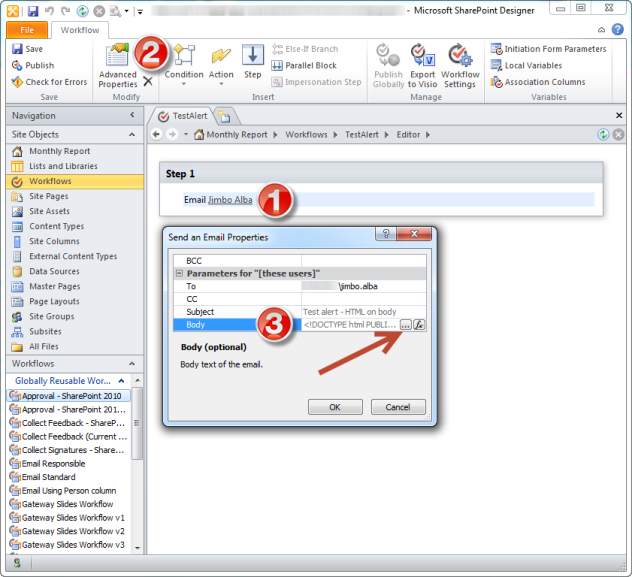
    1. Click on the Email workflow step.
    2. Click on Advanced Properties.
    3. On the Send an Email Properties popup click on the Body, then on the ellipsis button.
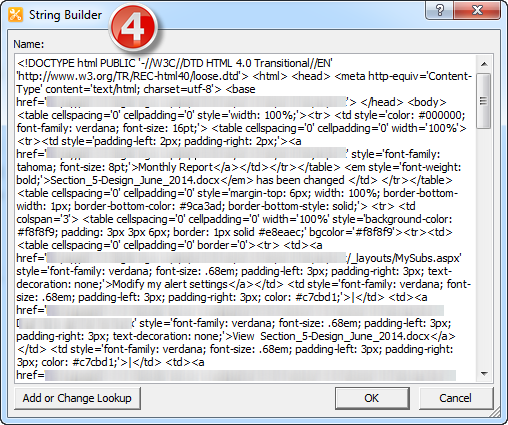
    4. The String Builder window opens. Paste the html and click OK button.

    SPD_Html_Emails

    Related Article:

     
  • Jimbo Alba 12:59 am on July 3, 2014 Permalink | Reply  

    Microsoft.SharePoint.SPEndpointAddressNotFoundException: There are no addresses available for this application 

    Microsoft.SharePoint.SPEndpointAddressNotFoundException: There are no addresses available for this application.  
     at Microsoft.Office.Server.Search.Internal.UI.SearchAdminPageBase.ErrorHandler(Object sender, EventArgs e)    
     at System.Web.UI.TemplateControl.OnError(EventArgs e)   
     at System.Web.UI.Page.HandleError(Exception e)   
     at System.Web.UI.Page.ProcessRequestMain(Boolean includeStagesBeforeAsyncPoint, Boolean includeStagesAfterAsyncPoint)   
     at System.Web.UI.Page.ProcessRequest(Boolean includeStagesBeforeAsyncPoint, Boolean includeStagesAfterAsyncPoint)   
     at System.Web.UI.Page.ProcessRequest()   
     at System.Web.UI.Page.ProcessRequest(HttpContext context)   
     at ASP._layouts_viewscopes_aspx.ProcessRequest(HttpContext context) in c:\Windows\Microsoft.NET\Framework64\v2.0.50727\Temporary ASP.NET Files\root\f9763a27\ff293fc2\App_Web_viewscopes.aspx.2a428413.q50wkr7w.0.cs:line 0   
     at System.Web.HttpApplication.CallHandlerExecutionStep.System.Web.HttpApplication.IExecutionStep.Execute()   
     at System.Web.HttpApplication.ExecuteStep(IExecutionStep step, Boolean& completedSynchronously)
    To fix this go to SPCA -> Manage Services on Server and make sure the Search Query and Site Settings Service is Started
     
  • Jimbo Alba 12:52 am on July 3, 2014 Permalink | Reply
    Tags: search scope   

    Creating Scope Rules on SearchScopes using PowerShell 

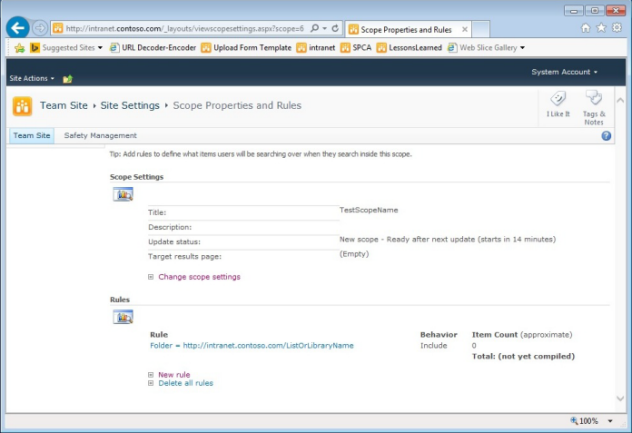
    I happened to maintain around 200 rules on 4 search scopes. Adding rules to Search Scopes is a slow process so I use this script to do it.

    $scopeName = 'TestScopeName'
    $siteUrl = 'http://intranet.contoso.com'
    $searchSvcApp = 'Search Service Application'
    $site= Get-SPSite $siteUrl
    $searchContext = [Microsoft.Office.Server.Search.Administration.SearchContext]::GetContext($site)
    $scopes = New-Object Microsoft.Office.Server.Search.Administration.Scopes($searchContext)
    $myscope = $scopes.GetScope($siteUrl, $scopeName)
    $ssa = Get-SPEnterpriseSearchServiceApplication -Identity $searchSvcApp

    And now to actually add the rule to the search scope.

    New-SPEnterpriseSearchQueryScopeRule -Url $siteUrl -Scope $myscope -RuleType Url -UrlScopeRuleType Folder -FilterBehavior Include -MatchingString 'http://intranet.contoso.com/ListOrLibraryName/' -SearchApplication $ssa
    Test Search Scope Name

    Test Search Scope Name

     
  • Jimbo Alba 10:15 pm on May 10, 2012 Permalink | Reply
    Tags: active directory, administrator password   

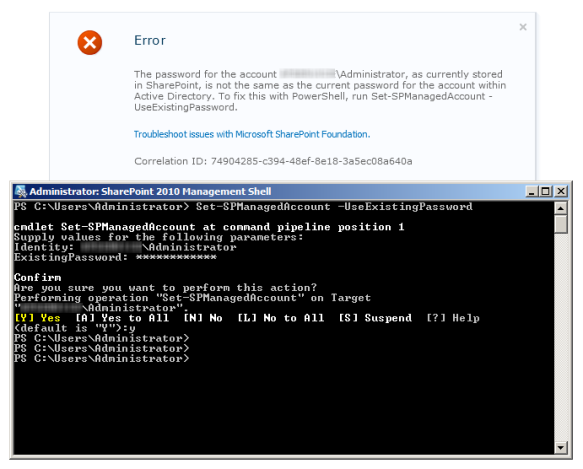
    SharePoint Managed Account Password not the same with Active Directory 

    The password for the account as currently stored in SharePoint is not the same as the current password for the account within Active Directory

    Set-SPManagedAccount -UseExistingPassword

    This happened when my Administrator password and I’ve changed it. The password was updated in Active Directory. Running the PowerShell command tells SharePoint to update it’s record too.

    Reference: Set-SPManagedAccount

     
  • Jimbo Alba 10:58 pm on February 1, 2012 Permalink | Reply
    Tags: event logs   

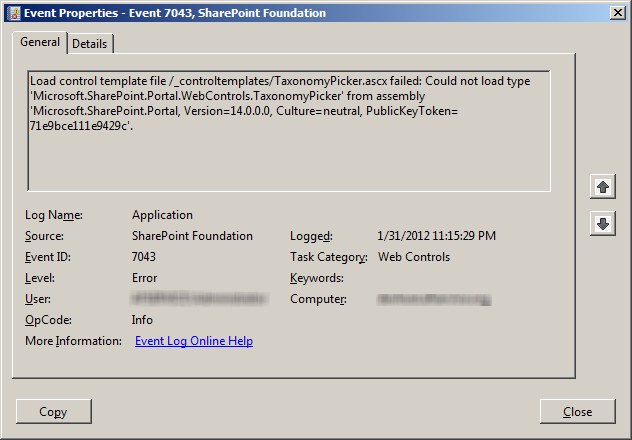
    TaxonomyPicker Error on Event Logs 

    I always see this error on the logs. Though harmless it’s also useless.

    TaxonomyPicker Error on Windows Event Logs

    TaxonomyPicker Error on Windows Event Logs

    To stop seeing this error just rename the TaxonomyPicker.ascx to something else.

    cd "C:\Program Files\Common Files\Microsoft Shared\Web Server Extensions\14\TEMPLATE\CONTROLTEMPLATES"
    ren TaxonomyPicker.ascx TaxonomyPicker.ascx_useless
     
  • Jimbo Alba 9:41 pm on October 20, 2011 Permalink | Reply
    Tags: powershell, sharepoint   

    How to Find a Feature using GUID 

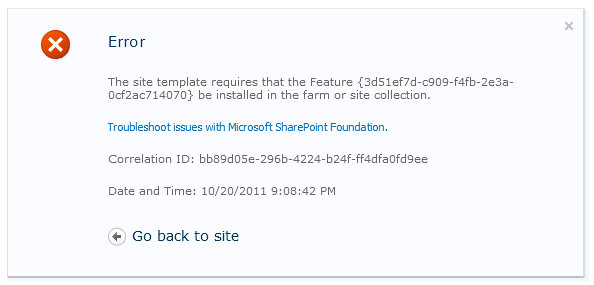
    Suppose you’re creating a site and encountered an error like this.

    You want to know what feature it is missing by using the GUID. Here’s how using PowerShell.

    Get-SPFeature -Identity enter_guid_without_braces.

     Get-SPFeature -Identity d5191a77-fa2d-4801-9baf-9f4205c9e9d2

    And if you want just a list of all features run the command without parameters.

    Get-SPFeature
     
  • Jimbo Alba 9:13 pm on September 21, 2011 Permalink | Reply  

    InfoPath Logging Stsadm Commands 

    I sometimes need to change the diagnostic logging levels temporarily to debug InfoPath Web Forms.  I’ve created this  batch commands you help you do that quickly.  These commands I’ve used on MOSS.

    Save how the current diagnostic levels are set on your server

    You should do this before you begin.

    stsadm -o listlogginglevels

    Set the trace levels to verbose

    stsadm -o setlogginglevel -category "Forms Services Administration" -tracelevel verbose
    stsadm -o setlogginglevel -category "Forms Services Conversion and Deployment" -tracelevel verbose
    stsadm -o setlogginglevel -category "Forms Services Data Binding" -tracelevel verbose
    stsadm -o setlogginglevel -category "Forms Services Data Objects" -tracelevel verbose
    stsadm -o setlogginglevel -category "Forms Services Deployment" -tracelevel verbose
    stsadm -o setlogginglevel -category "Forms Services File Open" -tracelevel verbose
    stsadm -o setlogginglevel -category "Forms Services Object Model" -tracelevel verbose
    stsadm -o setlogginglevel -category "Forms Services Rendering" -tracelevel verbose
    stsadm -o setlogginglevel -category "Forms Services Runtime" -tracelevel verbose
    stsadm -o setlogginglevel -category "Forms Services Runtime - Business Logic" -tracelevel verbose
    stsadm -o setlogginglevel -category "Forms Services Runtime - Data Connections" -tracelevel verbose
    stsadm -o setlogginglevel -category "Forms Services Runtime - Session State" -tracelevel verbose
    stsadm -o setlogginglevel -category "Forms Services Validation" -tracelevel verbose

    Set the trace levels to medium (normal setting)

    stsadm -o setlogginglevel -category "Forms Services Administration" -tracelevel medium
    stsadm -o setlogginglevel -category "Forms Services Conversion and Deployment" -tracelevel medium
    stsadm -o setlogginglevel -category "Forms Services Data Binding" -tracelevel medium
    stsadm -o setlogginglevel -category "Forms Services Data Objects" -tracelevel medium
    stsadm -o setlogginglevel -category "Forms Services Deployment" -tracelevel medium
    stsadm -o setlogginglevel -category "Forms Services File Open" -tracelevel medium
    stsadm -o setlogginglevel -category "Forms Services Object Model" -tracelevel medium
    stsadm -o setlogginglevel -category "Forms Services Rendering" -tracelevel medium
    stsadm -o setlogginglevel -category "Forms Services Runtime" -tracelevel medium
    stsadm -o setlogginglevel -category "Forms Services Runtime - Business Logic" -tracelevel medium
    stsadm -o setlogginglevel -category "Forms Services Runtime - Data Connections" -tracelevel medium
    stsadm -o setlogginglevel -category "Forms Services Runtime - Session State" -tracelevel medium
    stsadm -o setlogginglevel -category "Forms Services Validation" -tracelevel medium

    The commands only change the trace levels.  I’m using a tool to monitor trace logs called ulsviewer.

     
  • Jimbo Alba 2:36 pm on December 8, 2010 Permalink | Reply  

    Using VMware Workstation to Run the 2010 Information Worker Virtual Machines 

    I’ve download the 2010 Information Worker Demonstration and Evaluation Virtual Machine (RTM) but somehow I wanted run this using VMware Workstation.  Here’s some quick instructions on how to do this easily.

    Applications Used:

    1. Create a new virtual machine based on Windows Server 2008 x64 Edition. You can remove the Sound Card and Floppy from your virtual machine settings. Also remove the Hard Disk.
    2. Convert the 2010-7a.vhd file to .vmdk file. Open WinImage and click on Disk -> Convert Virtual Disk image… Select  Create Fixed Size Virtual Hard Disk (Recommended. Make sure you have 130 GB of free space).   Save the file and don’t forget to change the Save as type: to VMWare VMDK (*.vmdk)
    3. Add the converted file to your virtual machine.

    Now you’re ready to run the virtual machine for the first time.

    If you don’t have VMware Workstation you can use VMware Player (free) and use easyvmx (again free) to create virtual machines for VMware Player.  You can check this blog for more detailed instructions.

    Other things I’ve tried:
    I also tried to convert the .vhd file to .vmdk file using StarWind V2V Image Converter v5.6 but I’m only getting a BSOD on both VMware Workstation 6.5.4 and VirtualBox 3.2.10.


c
Compose new post
j
Next post/Next comment
k
Previous post/Previous comment
r
Reply
e
Edit
o
Show/Hide comments
t
Go to top
l
Go to login
h
Show/Hide help
shift + esc
Cancel